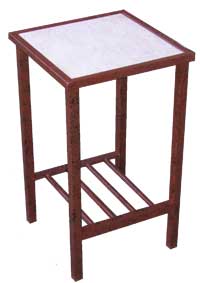
Wrought iron is a great looking material for home furniture. Wrought iron tables look awesome, but are they easy to make? Yes! This little table can be made, painted, and in use in only a few short hours.
What exactly to call wrought iron is a little of a mystery, though it shouldn't be. Some spell it rot iron, some rought iron, but it's really wrought iron. However you spell it doesn't matter -- you know that the long-wearing, rustic style looks great.
We'll be making a table with the rustic look, but to speak properly we're using mild steel. There was once a metal also known as wrought iron, which is no longer produced.
To make a table, you should know a little bit about cutting metal and welding, but you don't need to be an expert. This project is easy enough to be a first project, just take your time.
First you'll need to find an appropriate tile for the table top. Measure it's width, and we'll use that to build our table around. Our tile was 12.25" wide, and we'd like to give it between 1/4 and 1/8 on either side.
Cuts List
Using this measurement, we made the following cuts:
4 x 1" sq tubing x 23" - legs
4 x 3/8" sq tubing x 13" - bottom horz supports
2 x 1" angle x 12 - main horz supports
4 x 3/4" sq tubing x 14" at 45 degrees - top
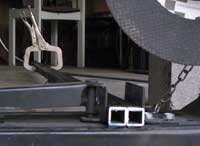 When you cut your materials, the tip in the photo will save you time and help make sure those cuts are exactly the same. Remember measure twice, cut once!
Measure three times if you have to, because if you screw up
the metal it will be wobbly and you'll be doing it over again.
Metal working teaches patience.
When you cut your materials, the tip in the photo will save you time and help make sure those cuts are exactly the same. Remember measure twice, cut once!
Measure three times if you have to, because if you screw up
the metal it will be wobbly and you'll be doing it over again.
Metal working teaches patience.
Lock in your chop saw at the 45 for the top cuts. For tubing, just flip the tube over and you can cut the opposite angle without repositioning the guide.
Weld the Top
You'll need
a square to do the 45 degree angles. Either use a square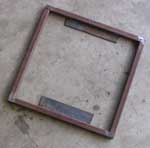 , or those magnets
that hold things at 90 degree angles. Make sure that the tile
fits in the frame. Remember to make small tack welds to hold the material together before you finish weld it. Get the whole top assembled before finish welding.
, or those magnets
that hold things at 90 degree angles. Make sure that the tile
fits in the frame. Remember to make small tack welds to hold the material together before you finish weld it. Get the whole top assembled before finish welding.
Now fit your tile back into the top. If you want it to sit flush, turn the whole assembly upside down so the tile and top sit flush on your welding table. Using any flat stock you have laying around weld some tabs in the frame to hold the tile.
Attach the Legs
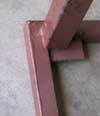 With the top still upside down, fit the legs. We preferred to use a slight inset instead of welding them flush with the side. Weld in your horizontal supports and you're done!
Put on a coat of primer, then a coat of paint. Go over it with a faux technique if you like. Clear coat it finally and then put the tile in, and let the compliments come rolling in!